
• Products
    CHARGERS

    MX7

    MX Pro – Coming soon

    EQ7

    APPS

    Humax Charge – for drivers

    Humax Installer – for installers

  • Solutions

    For Fleet Managers
    Company car reimbursement

    For Home Users
    Smart home charging

    For Property & MDUs – Coming soon

    For Depots & Logistics – Coming soon

  • Support

    Contact Us

    App Downloads

  • About

    About Humax

    Media

Buy Now
🌍 Global
🇬🇧 UK
🇩🇪 DE
🇰🇷 KR

General Information

  • Safety Guideline
  • Product Specification
  • Declaration of Conformity

Humax EV Home Charging

  • Installation Guide
  • User Manual
  • Getting Started
    • EQ7 – Getting Started
  • FAQ
    • MX7 FAQ
    • EQ7 FAQ

Register Support Ticket

  • Register Support Ticket
  • Contact Us
  • Model Cancellation Form

Installer Hub

  • Installation Guide
  • CT Instructions
    • EQ7 – CT Instructions
  • Wall Mounting
    • MX7 – Wall Mounting
    • EQ7 – Wall Mounting
  • Wiring Instructions
    • EQ7 – Wiring Instructions

User App Guide

  • MX7
    • Login
    • Sign up
    • Account and Profile Management
    • Charger Registration
    • Charger Network Configuration
    • Register RFID Card
    • EV Registration
    • Charging Modes
    • Charging Modes – Auto Solar Charging
    • Charging Modes – Instant Charging
    • Charging Modes – Intelligent Charging
    • Charging Modes – Charging Speed
    • Charging Modes – Schedule Charging
    • Charger Lock
    • Charger Management
    • Energy Tariff Management
    • Energy Monitoring Device Management
    • Load Balancing Settings
    • Charging History
    • Notification History
    • Settings
    • Help and Feedback
    • Firmware Update
    • Check App Version

Installer App Guide

  • MX7
    • Installer App Download
    • Charger Connection
    • Network Settings
    • Load Balancing Settings
    • LED Configuration
    • RFID Card Registration
    • Installation Info Verification
    • Installation Test
    • Ownership Transfer
    • Installation History
View Categories

EQ7 – CT Instructions

Download #

>> CT Instructions

Overview #

Power coming into the property is monitored by a Current Transformer (CT) that clamps around the property’s incoming power cable and is then connected to the charge point.

  • The CT has a cable allowing it to be connected to the charge point.
  • Additional cable may be added to the CT cable but to maintain a good signal, it is recommended that cables extensions are kept as short as possible.

How to Connect the Wire #
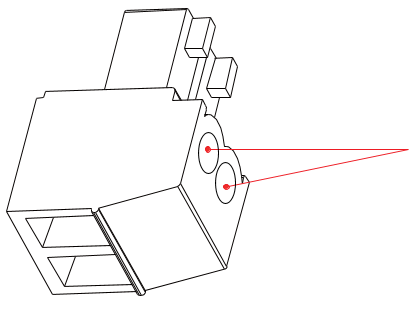
Figure 1

Step 1:
Loosen the two screws with a fat screwdriver (fat head size: 2mm), as shown in the Figure 1.
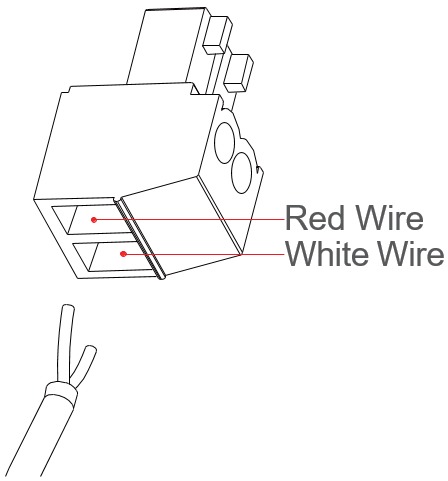
Figure 2

Step 2:
Insert the red wire and white wire into the corresponding holes, as shown on the Figure 2.
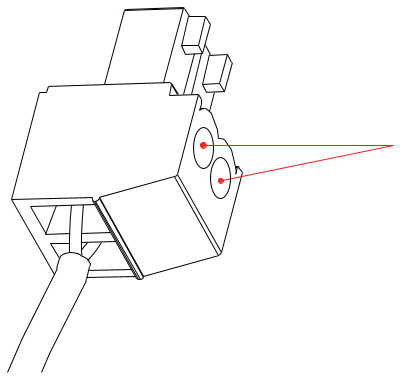
Figure 3

Step 3:
Tighten the two screws with the fat screwdriver (fat head size: 2mm) to crimp the two wires.
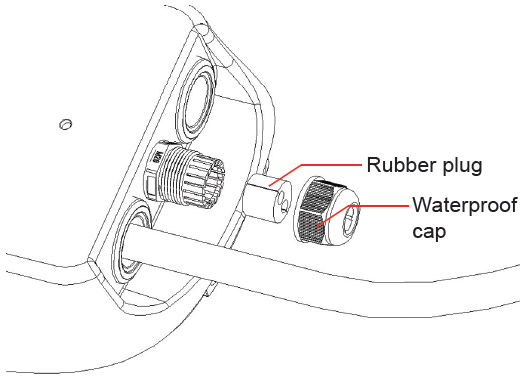
Figure 4

Step 4:
Unscrew the waterproof cap and take out the rubber plug.
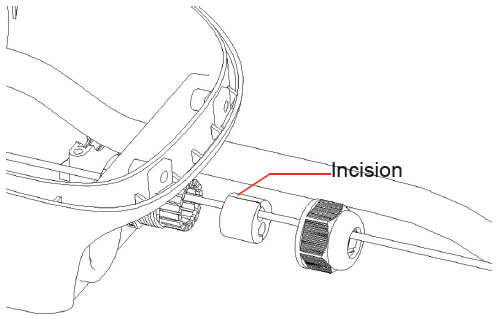
Figure 5

Step 5:
Pass the wire attached to the CT’s jack through the center hole of the waterproof cap, then press it into the rubber plug from the incision, and connect it to the inside of the charger.
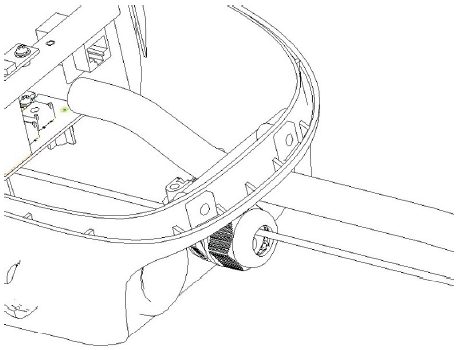
Figure 6

Step 6:
Tighten the waterproof cap.
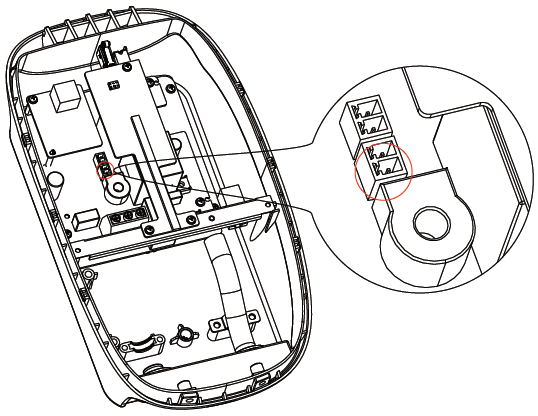
Figure 7

Step 7:
Insert the CT’s jack into the socket as shown on the printed circuit board.

Connect the CT to the Property #

  1. The CT clamp should be positioned around the phase cable between the Meter and the Consumer Unit.
  2. The arrow shown on the CT clamp must point in the direction of electrical flow TOWARD the consumer unit.
    • Alternatively, if required, the CT clamp may be positioned on the Neutral cable leaving the Consumer Unit. The arrow on the CT clamp must point in the direction of electrical flow AWAY from the consumer unit.
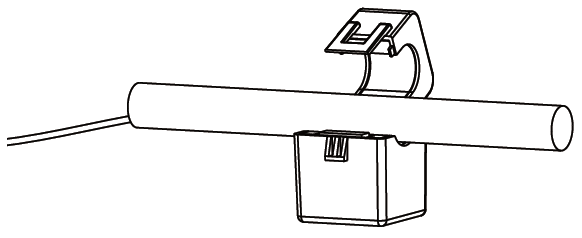
Figure 8

Step 8:
Release the clip on the CT clamp then open the clamp, and place the CT clamp around the power cable.
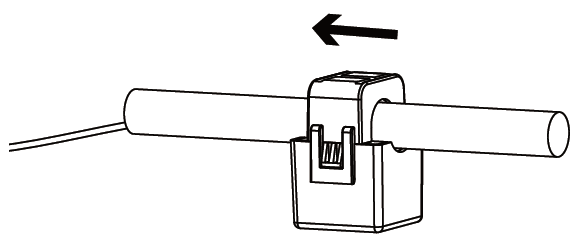
Figure 9

Step 9:
Close the CT clamp and secure it with the clip.

  • Make sure the arrow on the clamp points in the correct direction.
  • No other cables should pass through the CT clam
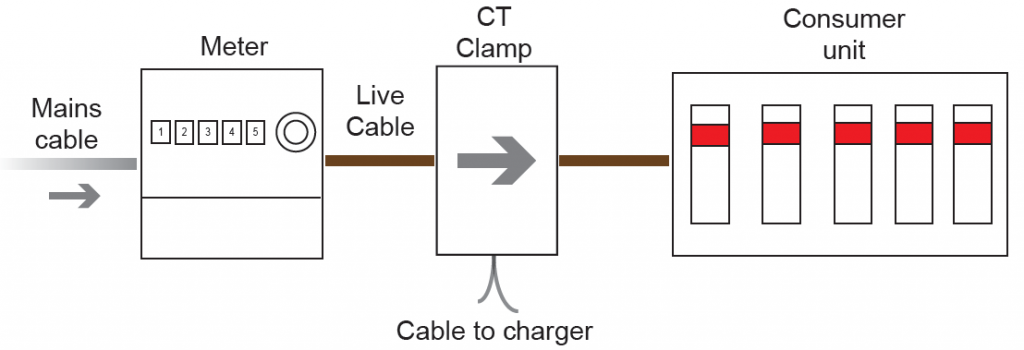
Figure 10 CT Clamp Positioning

EQ7 – CT InstructionsEQ7 – CT Instructions
Table of Contents
  • Download
  • Overview
  • How to Connect the Wire
  • Connect the CT to the Property
Linkedin Facebook-f Youtube
PRODUCTS
  • MX7
  • MX Pro
  • EQ7
  • Humax Charge App
  • Humax Installer App
SOLUTIONS
  • For Fleet Managers
  • For Home Users
  • Property & MDUs
  • Depots & Logistics
POLICIES & LEGAL
  • Privacy Policy
  • Open Source
ABOUT
  • About Humax
  • Media
  • Contact Us
© 2026 HUMAX Co., Ltd. All rights reserved.