Screen Overview #
- Select the Humax Server (or another service platform) to which the charger will be connected, then proceed with the network settings.
- If you intend to use the charger without a network connection, you can select Offline Mode.
- Depending on the charger’s firmware version, applying the network settings may cause the charger to restart automatically.
Feature Details #
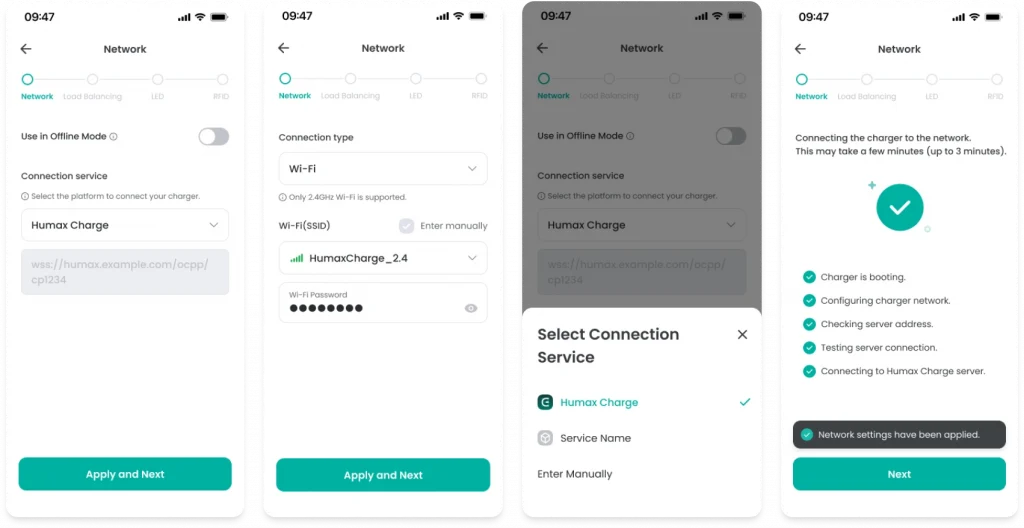
- Navigation Section
Location: Top of the screen
Function: Displays the installation progress steps. It consists of four stages—Network, Load Balancing, LED, and RFID—and visually indicates the current step and completion status.
Notes: Not interactive. The current step is highlighted, and completed steps are indicated with a check mark. - Offline Mode Toggle Button
Location: Below the Navigation
Function: A feature exclusive to the HS71007 model. When Offline Mode is enabled, the charger operates independently without connecting to a server.
Notes: Disabled by default. Changing the toggle requires the charger to be restarted. - Connection Service Dropdown
Location: Below the Offline Mode toggle
Function: Allows selection of the platform to which the charger will connect. The default is “Humax Charge”, and selecting it displays a platform selection modal.
Notes: If “Enter Manually” is selected, a field for directly entering the OCPP server URL becomes available. - OCPP URL Input Field
Location: Below the Connection Service dropdown
Function: When “Enter Manually” is selected from the Connection Service dropdown, this field allows manual entry and editing of the OCPP WebSocket address.
Notes: The OCPP URL provided when selecting a platform from the Connection Service dropdown cannot be edited. - Connection Type
Location: After setting the Connection Service
Function: Allows selection of the connection method, either Wi-Fi or LAN (Ethernet), via a dropdown menu.
Notes: Default is Wi-Fi. If a value is already configured on the charger, that value is displayed. - Wi-Fi Selection Dropdown
Location: Displayed when Wi-Fi is selected
Function: A dropdown showing the list of Wi-Fi networks scanned by the charger. Selecting it opens a Wi-Fi list modal.
Notes: When an SSID is selected, it is displayed along with a signal strength icon, and a password input field appears below. - Wi-Fi Password Input
Location: Displayed after selecting a Wi-Fi SSID
Function: Allows entry of the password for the selected Wi-Fi network. Includes options to show/hide the password and clear all input.
Notes: The entered information can be edited. - Enter Manually
Location: Within the Wi-Fi section
Function: When the checkbox is enabled, the Wi-Fi Name and Password input fields are displayed instead of the Wi-Fi selection dropdown, allowing manual input.
Notes: Depending on the charger firmware version, only the Enter Manually option may be available. - Apply and Next Button
Location: Bottom of the Connection Type screen
Function: Applies the configured server and network settings to the charger. The charger will then automatically proceed with network configuration and server connection.
Notes: Enabled only when all required information has been entered.
Additional Info #
- Offline Mode: A feature exclusive to the HS71007 model, allowing the charger to operate independently without a server connection.
- Wi-Fi Limitation: Only 2.4GHz Wi-Fi is supported. 5GHz-only networks are not supported.
- Charger Restart: The charger will automatically restart when Offline Mode is changed.
- Settings Storage: The configured network settings are stored on the charger.
Specific Scenarios #
- Unable to Find Wi-Fi Networks
Displayed when the Wi-Fi scan is complete but no networks are found.
– A “No network found” message is shown along with an empty list.
– You can press the “Select” button to rescan.
– Ensure the charger is within range of a 2.4GHz Wi-Fi signal. - Installation Interruption Confirmation
A confirmation modal displayed when attempting to go back or exit before pressing the “Apply and Next” button.
– The title “Are you sure you want to exit?” and a warning message are shown.
– Description: “Leaving the installation process is not recommended. In this case, the charger setup may not be completed properly.”
– “Continue Installation” button: Continues the installation process.
– “Exit” button: Returns to the main screen, and the charger setup may not be completed. - Offline Mode Limitations Notice
Displays a message explaining the features that are restricted after Offline Mode is applied. – A warning message appears in the centre of the screen.
– “Control via server, network connection, load balancing, and LED settings are not available in offline mode.”
– Informs that server control, network connection, load balancing, and LED settings are unavailable in Offline Mode.
– With this warning message, you can proceed to the next step (RFID settings) by pressing the “Next” button.
Technical Details #
- Configuration via BLE: All network settings are encrypted and transmitted to the charger via a BLE connection.
- Wi-Fi Scan Frequency: The charger scans for nearby Wi-Fi networks when the Wi-Fi dropdown is opened, and rescans upon user request.
- Offline Mode: When enabled, the charger does not attempt to connect to a server and can only be controlled via BLE and RFID.
- 2.4GHz Only: The charger supports only the 2.4GHz Wi-Fi band, and 5GHz networks will not be detected.
FAQ #
- Q. When should Offline Mode be used?
– It is used when operating the HS71007 model independently without an internet connection.
– In Offline Mode, charging can only be controlled via the app or an RFID card, and remote monitoring and OTA updates are not available. - Q. The Wi-Fi password is correct, but the connection fails.
1) Check whether the router supports the 2.4GHz band.
2) Ensure the correct SSID has been selected.
3) Try restarting the router.
4) Reduce the distance between the charger and the router. - Q. I selected LAN, but the settings are not saved.
– Ensure the LAN cable is physically connected to the charger. After connecting the cable, press the “Apply and Next” button to save the settings. - Q. The charger restarts after applying network settings. Is this normal?
– Yes, depending on the firmware version, the charger may restart to apply the network configuration. The restart typically takes about 1–2 minutes. - Q. Where can I find the Connection Service URL?
– The default OCPP server URL is set automatically. If using a custom server, you can obtain the URL from your service provider and enter it manually. - Q. Can I change previously configured network settings?
– Yes. When you reconnect to the charger via the installer app, the existing settings will be displayed. You can modify them and press “Apply and Next” to save the changes.
